Let's have a look at one of the classics of MDF - TTCombat's Dino Filling Station, the Deluxe variant!
This or the predecessor is a staple of zombie gaming tables, at least the ones I've seen, although it can be used on any modern (from the ~70s on) and sci-fi gaming table.
The kit itself comes as usual for MDF in a large plastic bag, in several sheets of MDF and one sheet of cardboard for detailling.
Assembly
It comes without instructions; those can be found on the TTC website for free. As with the Grey Harbor House A by the same company there was the odd little imperfection when it came to fit, but way less so than on the other kit. For assembly, just use good old white or wood glue.

This is a more complex kit though, and thus requires even more consideration of what to assemble and what not to glue on prior to painting. Airbruhes and spray paint comes handy when painting those large MDF buildings and since we only want the paint to go where we want it to go it's worth puting some tought into the assembly process.
Which of course is counter-intuitive. MDF kits are cheap and easy to build, so the first impulse is to "breeze through the assembly", but that's one of the first trappings one might fall for. The second being "painting that will be fast and easy", but we'll get to that later.
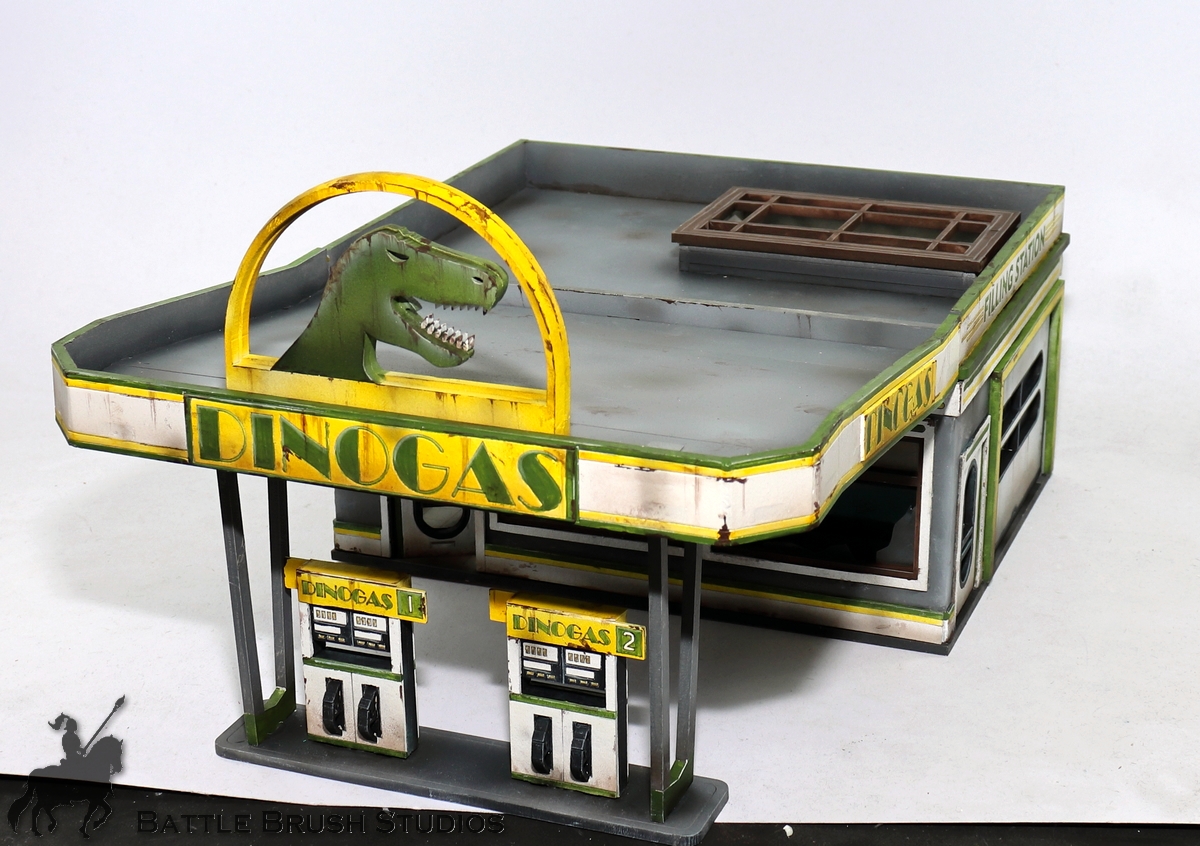
This is the model assembled as per TTCombat's website. My own model looked pretty much like that when it was put (or dry-fitted) together.

If memory serves right, this is what I did not glue on prior to priming and the base coats: inner walls, roof, the whole front roof, the dinosaur logo on top, the gas pumps, the front door and the cardboard linings around the main building and around the windows.
At least this kit wouldn't require any roof tiling or application of texture. Filling a bunch of gaps will add to the look tremendously though, especially so on the railings on the front roof around the dino logo, between the two layers of the dino logo and to hide the joints where the walls of the main building meet. All of that was done with the help of our old friend Milliput.
Painting
First I gave it a nice layer of white primer (black primer with some strategic spraying of white may have gotten me a better depth, but oh well) and then I got to painting. First a lot of spraying and masking, then a LOT of hand-painting all sorts of logos, lettering, lines and details. Then the actually good (and important!) stuff especially on MDF starts - weathering and dirt and all of that.
Before that though I also added some remains of broken shop windows cut from blister packs or something like that and then painted with some matte varnish (so it shows better) and some grime added.
Oh, I also printed and posters and glued them onto the walls to add some (remnants of) life and break up the big solid chunks of colour.
..and that's that!
It still looked a bit too artificial to me, so I added some dead leafs in the very end, on the outside as well as on the outside.
...and here's some more pictures of the finished building. Not the least because When doing these buildings reference pictures on the internet can be really helpful:
The green tool bench in the garage is from a different kit. In terms of interior detailling the kit is rather spartan (it comes with basic shelves in the front and a separate vending machine I haven't finished ot this day), as TTC kits tend to be. Btw, the sporty car juuuuuust so fits into the garage. A larger 28mm sized pick-up didn't fit.
The front door I glued in slightly opened, just to add some sort of angle to the boxy building.
Verdict
I like this kit a lot. I really like the big dinosaur logo, I like that it depicts something from the real world, I like the size. It's a solid centre piece for a gaming table and a useful addition to any urban, sub-urban or rural table.
And it's cheap as chips for what you get. GBP 17.00 for a building that size and neatness is hard to beat. The downside is that it takes a lot of work to get to look satisfying. And even then, MDF buildings always leave me with a feeling of "this is serviceable, but its not really 'pretty'". Maybe it comes with the utilitarian look of this particular building as well.
Another constant problem of course is storage. That's a given with 28mm terrain of course, but we have to add the factor of sturdiness to this. If you glue it down onto a big MDF base there's barely a problem. I did not do that though, because I want to be as flexible as possible with my terrain, so I stored it in two parts: Main building and roof and front roof with the gas pumps stuck on.
The supports which connect the front roof with the gas pumps are pretty flimsy MDF supports, which I kinda snapped a few weeks after these photos were taken. Not a problem, I redid the connector parts and it's all well now, but it was a bit of a downer. Of course this isn't a problem with the design, but more my own way of storing the building. Maybe it's better to replace the supports right away, because from a visual stand point those are my least favourite part of the kit anyway. Something round would work a bit better there, I think.
But look at it! It's a pretty neat looking thing, isn't it. And if you're willing to invest the time it makes for a really good modern gas station. It's one of those buldings for which MDF is suited very well and the price is hard to beat. I'm planning to add a counter at some point, because this needs a cash register and a rack or two of magazines.
If you have any questions, maybe review requests, suggestions or ideas feel free to use the comments section below or just contact me via e-mail or Battle Brush Studios' Facebook page. The same goes of course for commission requests. See you soon! :-)


Keine Kommentare:
Kommentar veröffentlichen