


In this article I would like to share with you some pictures of my Dark Ages/Medieval village, how I built it and so on. Hit the jump for lotsa pictures and enlightenment through PVA and super glue.
...this is pretty much how I started my last "My Kind of Town" article in 2015. Since then I haven't done any 28mm building projects of that magnitude, but about a year ago something captured my imagination.

The Crossing the Berezina scenario by David Davies from WSS magazine issue #121. A WW2 scenario set on the Eastern Front. On top of that I've been wanting to get 28mm "Eastern European buildings" for a while now.
The Idea
So the vision was: Make several (as many as possible really) buildings which would fit for pretty much anything between Silesia and Moscow. And from about 1800 to the 1940s. Needless to say that the result would never fit any of these perfectly. It's always an abstraction. And a compromise.
I like terrain which can be used as universal as possible, so it wouldn't have to be accurate to one area or timespan. I had a general idea of what I wanted to see in these buildings: wooden walls, tiled roofs, decorated window and door frames, for the "authentic Eastern European" look.


Izba-style!

I did not want to go with all MDF buildings (as much work as scratch-buildings for what I had in mind) or resin buildings (cost).
After gathering some 'inspiration' I swiftly was goaded into scratch-building the whole lot. I had a close look at the excellent offerings by Warbases, Charlie Foxtrot, Things from the Basement, Sarissa, and some 3d printing stuff. Buying 3d printed buildings (I don't own a 3d printer myself yet) is weirdly expensive I realized. Buying MDF is cheap, but requires pretty much as much work as scratch-building anyway.
Another useful source of inspiration was the WW2 Russian village, as posted by Jasper Oortuys on social media and of course the Tactical Painter's excellent 20mm Eastern Front terrain.
Cpt.Shandy, who is a savant scatch-builder of historical buildings, suggested wood-pulp board as the basic material, and I have to say that it's a lovely material. It's easy to cut, easy to glue, sturdy, and inexpensive. It's basically a biiiiig and thicker beer coaster.
The Execution
So I got a few sheets of that stuff (in the end I was good with about 1.5 A2 sized sheets), a few new stanley knife blades, PVA glue, and went ahead. And cheated.
A Few Sheets of 'Inspiration'
Kromlech, makers of not-40k resin parts and kits, also have rather nice and affordable range of MDF buildings for Poland (officially for 1939, but it'll work for quite a timespan).

These kits are pretty darned impressive; maybe I'll write about them separately some time. They come with some nice accessories (like an outhouse, some carts, stools, etc.) and interior details. The downside is the usual MDF stuff (lack of texture, joints, overall very artificial look), so they require lots of extra work, as mentioned above. Especially the log cabin look would be problematic, no matter wether I use a substructure of MDF or cardboard.
The Walls
So first I put together what I had in MDF and added texture by means of hacking at the MDF and doing things to it with the dremel. The former inside (cautious and unhappily), the latter outside in the garden, with a dust mask on. Also unhappily. I don't particularly enjoy dremelling MDF or even cutting it too much where it's not intended to be cut.
But it's gotta be done. Here is a WIP shot of the first few buildings. The two in the back are MDF, with wooden board texture added. The building in the front has a converted roof and was covered in coffee stirrer sticks.

The building in the back left got a cardboard roof substructure. By the way, I did not intend to do interiors due to time constraints and the scale of the project, but keep the roofs removable in case I want to place figures inside.
Then I saw something rather useful on the What a Cowboy! facebook group - half-round (more or less) bamboo sticks:

These can help making at least somewhat convincing log huts without having to glue round pieces of wood together. It does require hacking at them though, to give one of the sides a more believable, half-rounded, hewn look.

Which worked OK. Doesn't give the typical overlapping ends at the corners, but at least it gives a proper texture to it. And certainly was faster than other ways I used for covering the cardboard walls on other buildings on which I used way narrower sticks.
What you can seee in this building especially is how I used different ways to do the walls. The main body of the building is made to look like it's made of big wooden logs, whereas the walls on the upper level and the vestibule (which can be seen on many buildings in the areas I aimed to represent) are made to look like they're made of wooden boards. Especially with the vestibule it looks like it's been added later or something.
This little add-on also helps changing the footprint and look of the building a little, to make it look a bit different. Most of the buildings I made for this collection have pretty much the same size. Reasoning was, that I planned to make a bunch of garden bases to put the buildings on, and having all buildings have roughly the same footprint would make that possible.That idea was ditched later on, but during the building phase it was still a thing. Due to this I tried to make the buildings themselves look individual.

...and that they do. I used various ways of making up the walls, I used various roof constructions, different-looking window and door frames (more on these in a bit)...


The Roofs
Originally I had planned to do all-tiled roofs. When I got to painitng the buildings I realized that this would lead to a somewhat monochrone look and on top of that thatched roofs make more sense and will help make the whole thing look even more diverse.
Before I get further into the thatched roofs, a few words on the tiled roofs, because they were more straightforward.

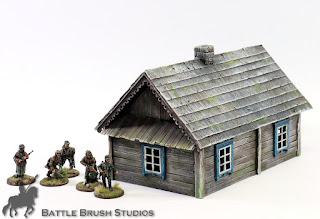
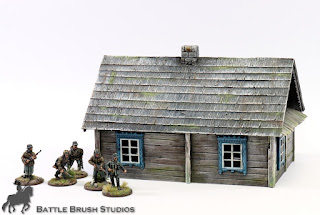
I really didn't want to do the same thing again. Not that I dislike the look. It looks alright, it just struck me as not looking quite correct, and I wanted to try something different. So I decided to go with the towel method.

I bought a bunch of sheets of laser-cut strips of roof tile from Charlie Foxtrot. They fit perfectly, and are easy to apply.

I was rather happy, but somehow the tiles tooked a bit too neat. So I added some texture. You may notice that I use that word a lot. Because it's all about texture to create believable surfaces. The world is bumpy, everywhere. (you can quote me on that. :-P ) A gaming table with flat, plain surfaces - be it walls, ground, or even bodies of water -, especially in 28mm skirmish games, will just look off or not as good as bumpiness all around. At least that's what I think. Same goes for figures too, I think. I prefer a a little grain.

Right, after this discourse I will quench your thirst for how to give laser-cut cardboard roof tile strips a wood grain texture: I had already glued the strips to the roof substructures. So I tried several things: back of the stanley knife - tore the cardboard and took forever. Comb: too soft. What's the middle ground between knife and comb? Exactly. The fork. So I took a fork and ran it over the roofs from the top to the bottom. Again and again and again. The metal fork is hard enough to leave marks on the cardboard, but isn't sharp enough to tear the tiles.
Fun fact: Running a steel fork over a roof of 9-10 strips of laser-cut cardboard strips makes a sound that sounds like the call of a Middle-European mallard. Or maybe I made those noises after the 4000th run of the fork over the cardboard. Can't remember. :-P
 |
| Picture of a duck. Because the paragraph above said "duck" and I need to break up the text. (Source: Wikipedia) |
Anyway, after that I really liked the look of the tiles. Now for an evergreen of wargaming buildings - thatched roofs! There are several really cool approaches to this topic and I did some research on thatched roofs in general.
On my early medieval village I used sheets of teddy fur, as was the fashion back then.
Thatched Roof
Here's the short version (because there are very good longer tutorials on this online anyway): Went to a 1 Euro Shop, bought three small hand towels, roughly cut stripes to cover the roofs, glued them to the roofs with PVA.
One thing you have to be careful of: All these towels consist of bascially a whole lot of tiny little slings of string. Those slings have a certain 'natural lay'. Be careful to place the strips of towels ina way that the little slings turn downward, so it looks like the strands of hay lay on top of each other.

Once they were somewhat glued to the roofs (since on most I use a substructure of thick cardboard I used just a little PVA with no water mixed in to glue the towel strips to the roofs and let them dry properly before the next step) I painted them in a PVA-water mix properly and gave them the final shape. The mix was applied with a wide painter's paintbrush, which I also used to give the roofs the final shape.

Then I cut some overhang and single stray strings off with scissors and left it to dry.


Oh, I also made chimneys. Piece of wood, Milliput, carved in the stone texture and a top, done.
...and there we were:

Window Frames and Door Frames
...and all the other bits which add 'local color'! This deserves its own few paragraphs, because these caused me quite some headache. I found two resin buildings on Barrage Miniatures' website, which show just what I wanted to do. Of course this was not possible for me, at least not within the time frame and the number of buildings I had in mind.
I looked around for suitable 3d models to print, could not find any for months. A very viable option would have been to press-mould them or make silicone moulds and cast them in resin. I did that a bunch of years ago for several smaller terrain items and bases, and I didn't feel like doing that due to time and - again - the scale of the project. For one or two buildings I may have gone ahead with more 3d looking adorned bits on the buildings, but for 9-10 such buildings for wargaming use I was OK with less fanciness.
So instead I went with what was available and less labour-intensive: Warbases have a nice range of Eastern Front buildings, and they happen to be extremely forthcoming with custom parts. So I worked out a big list of bits from their existing range, made to fit what I had in mind.

Note how the windows are a fair bit bigger than they should be if they were to scale. But larger windows are always handy. For gameplay and visual reasons.

I ended up with three different designs of window frames and nice decorative beams for the roofs and such. If you look at wooden buildings pretty much anywhere where people spend the winter you will find those decorations along the roofs. Mostly to keep the wind from blowing through the roof. And people throughout the ages liked to decorate their homesteads.

Not only did I read that in various areas of Poland and Western Russia people often painted their houses with lavishly colored floral designs. To strike a little half-way between this fact and to give the window frames a bit of a more three-dimensional and even more individual look to each building I gave them different colours and painted some swirly or more straight designs on to each.
Extra Bits and Bobs
Two of the buildings required me to add floors (didn't bother with floors on the ground-level ones). A pretty basic construction of a sheet of plasticard with a thin sheet of wood veneer on top. I bought that sheet a few years ago, knowing, that it would come in handy at some point.

So this building got a ground floor, slightly elevated, and a second floor.

So apart from the really big building above there's this one which required a slightly elevated floor:


As mentioned above, each building is unique, but share similar footprints. It's the colour scheme and overall look that pulls it all together, whilst maintaining a hand-made, "organically grown" look.
Then there's the barns/stables.

These are the Kromlech MDF kits. Some conversions here and there, roofs by yours truly, but mostly these are made pretty much out-of-the-box.

They come with interiors. Which is nice, but of course requires extra work. But the nice effect outweighs the extra time invested. :)


...which somes with a bunch of little extra bits.


...and interior details. I added a little dirt, visual traces of unmentionable smells, old straw and a little paint.

The litle shack in the right is scrach-built, the rest is bits which came with the MDF kits, and all of which were cut to look a nbit more convincing and weathered. Especially hese smaller models need that I think. It's not fun to do, but I rounded off eevery single piece of fence and spoke on each wheel and so on so it looks a bit more natural.

Around the House
Earlier I mentioned my initial plan of using large garden bases with fences all around, as seen in Tactical Painter's excellent 20mm terrain. That plan was ditched once the buildings were finished. These large bases have several advantages, such as the opportunity to model proper little gardens, with planter pots standing around, fixed fences all around, and so on. The downside, especially in 28mm, would be that these would end up being huge and rather hard to store.
So instead I opted for the following: Small patches of vegetable patches and flowerbeds on single bases.

So I swiftly made five bases of those. Of course I would need many more of those to really fill out the village, and of course I didn't have a single well either, but those will be added at a later point.
But now, it's off to the table! I immediately gave the new terrain a test run in a game of Big Chain of Command. Which was lovely.


This didn't utilize all of the buildings though, so here are some more shots, featuring almost all of the village at once, once with napoleonic Austrians passing by, once with Russian WW2 tanks passing by.


The buildings are meant to work for both periods (kinda). One might argue that the buildings are a bit fancy for the early 19th century especially, but I'd ay they work reasonably well. I'd also rather have nicer looking buildings for terrain rather than all too trodden down ones.

That bridge was also swiftly scratch-built, because I realized I only got stone bridges. But that's another story.

Learnings
Never done as much scratch-building as for this project. But it's dead easy really once you actually get going. From initial idea to the finish this took me roughly a year, but most of that was spent getting materials, agonizing with theory and one large pause in between steps, but I'm rather happy with the outcome now.
And the bit I almost cut off my little finger actually grew back on. During these weeks I learned a few things about bandaging as well, so that's another positive.
I've also become quite the fan of the towel strip method for thatched roofs. What do you think? I'm also fairly certain that I could add a few more buildings made the same way. I mean I still got a bunch of window frames an other materials. And really, this village needs a church for the 19th century, and a school for the 20th century. Oh, and those wells. And more vegetable patches. These projects are never really done, are they. :-D
Anyway, hope you enjoyed the article and found it useful. The bottom line is this: making terrain isn't hard. I'd say 80% of the work is sitting down and seriously getting to it. Once you start cutting things, it develops organically anyway. Especially once you got the basic shapes and so on.
 |
| Modelling mishap leading to this piece telling a story. The story of somebody facing immediate explosive evacuation trying to kick down the door. |
Right, thanks for reading, let me know if you have any questions, comments or commission requests via the comments section here, facebook, instagram or e-mail!
Absolutely fantastic work Sigur. I really like that tip on using a fork to add texture to laser cut shingles. I have a several sheets in a drawer that I haven't used, in part, because they look very flat.
AntwortenLöschenThanks very much. :)
LöschenYeah, I also got Warbases shingles, which are smaller and work a bit better for more modern shingles because they have a texture on them. But for older buildings I really like those Charlie Foxtrot ones..
Fantastic article on a fantastic project. Thanks for writing all this up, lots of inspiration.
AntwortenLöschenThanks very much for reading AND commenting on here, as well as on facebook. :)
Löschen1 year? Holy cow! I'm 2.5 years in & while I have a lot, I still have a long way to go. Not only is your work beautiful but you are fast at getting it done. Thanks for the read:-)
AntwortenLöschenCheers! Well, for the first bunch of months I wasn't even sure if I'd ever get it done or if it was a pipe dream. But it's really, really nice to have a project and work towards it.
LöschenSince I'm a wargamer, I first started getting all the miniatures I needed to fill out my collection for this scenario (and some others I have in mind). So I got a Maultier, a Russian HMG team, some more scouts, more LMG, another t34/76 (along with an SU85 for good measure :P ), and only once all of that was done I got to working on the buildings. :D